
You might expect that creating an Excel file in Salesforce would be easy — perhaps even supported natively. But as with many things in the life of a Salesforce consultant, it’s often not that simple.

In general, you have three options for exporting Excel files:
- Do it in the frontend
- Do it in the backend (Apex)
- Do it ou>sforce altogether
When to Use the Frontend Approach
The frontend (JavaScript-based) method is ideal when:
- You don’t need to store the file in Salesforce
- You want to avoid hitting Apex CPU or heap size limits
- You want an easy, lightweight solution
All you need is a JavaScript file with a library like ExcelJS uploaded as a static resource. It’s straightforward, efficient, and avoids unnecessary backend processing.
When to Use the Backend Approach
If you need to store the file in Salesforce, generate it on a schedule, or integrate with server-side logic, then Apex is your go-to. Here's a good example using Apex and ZIP-based Excel file reading: Salesforce Blog: Reading Excel Files Using Apex.
External File Exports
Exporting Excel files outside of Salesforce (e.g., via middleware or external platforms) is outside the scope of this article.
Scenario
Let’s focus on the frontend case. We have an existing Excel template that contains a very complex header — so complex, in fact, that nobody wants to recreate it in code. We want to add a list of Accounts to the file and tTrigger the download from an LWC.

Step-by-Step Guide
Upload ExcelJS as a Static Resource
Download ExcelJS from npm or the GitHub repo, and upload the minified version as a static resource:
Setup > Static Resources

  Upload exceljs.min.js with the name: excelJS

Upload Your Excel Template
Upload your .xlsx file as another static resource:
Setup > Static Resources

  Upload your Excel template with the name: excelTemplate

Prepare Apex Controller
Create a simple Apex class ExcelExportController to fetch Account data:
public with sharing class ExcelExportController {
    @AuraEnabled(cacheable=true)
    public static List<Account> getAccounts() {
        return [SELECT Name, Industry FROM Account];
    }
}
Build the LWC Component
Let's LWC named excelExport.
In excelExport.html, we’ll simply add a button that triggers the Excel file generation.
<template>
    <lightning-button
        variant="brand"
        label="Excel Export"
        title="Excel Export"
        onclick={generateExcel}
    >
    </lightning-button>
</template>
The button calls the generateExcel method, which needs to be implemented in excelExport.js and should perform the following steps:
- Load the ExcelJS library
- Load the Excel template
- Retrieve data from the Apex controller
- Generate the output
- Provide the file to the user
import { LightningElement } from 'lwc';
import { loadScript } from 'lightning/platformResourceLoader';
import excelJS from '@salesforce/resourceUrl/excelJS';
import excelTemplate from '@salesforce/resourceUrl/excelTemplate';
import getData from '@salesforce/apex/ExcelExportController.getAccounts';

export default class ExcelExport extends LightningElement {

    async generateExcel() {
        // Attach ExcelJS to the window object
        await loadScript(this, excelJS);

        // Load the excel template
        const template = await fetch(excelTemplate);
        const arrayBuffer = await template.arrayBuffer();
        const workbook = new window.ExcelJS.Workbook();
        await workbook.xlsx.load(arrayBuffer);

        // Get the first worksheet
        const worksheet = workbook.getWorksheet(1);

        // Get Account data from the Apex Controller
        const data = await getData();

        // Set constants for generating output
        const offsetRows = 3;
        const columnSize = 4;

        // Add Account data into the Excel
        for (let i = 0; i < data.length; i++) {

            // Get row
            const row = worksheet.getRow(offsetRows + i + 1);

            // Add data into the correct columns
            row.getCell(1).value = data[i].Name;
            row.getCell(columnSize+1).value = data[i].Industry;
            row.getCell(2*columnSize+1).value = data[i].Ownership;

            // Merge cells (top right corner, button left corner)
            worksheet.mergeCells(offsetRows + i + 1,1,offsetRows + i + 1,columnSize);
            worksheet.mergeCells(offsetRows + i + 1,columnSize + 1,offsetRows + i + 1,2*columnSize);
            worksheet.mergeCells(offsetRows + i + 1,2*columnSize + 1,offsetRows + i + 1,3*columnSize);

            // Commit changes on the row
            row.commit();
        }

        // Generate Excel as blob
        const buffer = await workbook.xlsx.writeBuffer();

        // mime-type: application/zip is correct as Excel is in fact zipped
        const blob = new Blob([buffer], {
            type: 'application/zip',
        });

        // return file to the user
        const link = document.createElement('a');
        link.href = URL.createObjectURL(blob);
        link.download = 'ExcelExport.xlsx';
        link.click();
        URL.revokeObjectURL(link.href);
    }
}
In excelExport.js-meta.xml we're going to specify, that LWC can be placed on record page.
<?xml version="1.0" encoding="UTF-8"?>
<LightningComponentBundle xmlns="http://soap.sforce.com/2006/04/metadata">
<apiVersion>63.0</apiVersion>
<isExposed>true</isExposed>
<masterLabel>Excel Export</masterLabel>
<targets>
<target>lightning__RecordPage</target>
</targets>
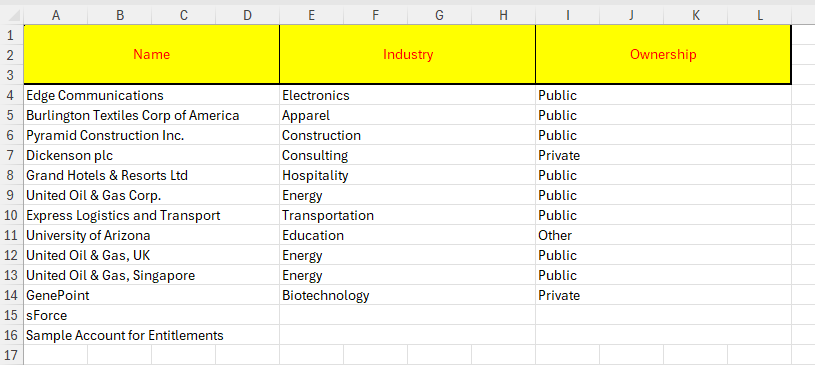
</LightningComponentBundle>Final step

Add the excelExport component to the Account record page in the Lightning App Builder, and you’re done!
Check the final output below.
Looking for an experienced Salesforce Architect?
- Are you considering Salesforce for your company but unsure of where to begin?
- Planning a Salesforce implementation and in need of seasoned expertise?
- Already using Salesforce but not fully satisfied with the outcome?
- Facing roadblocks in your Salesforce implementation and require assistance to progress?
Feel free to review my profile and reach out for tailored support to meet your needs!
Thanks
ReplyDeleteCan you tell me the version?
ReplyDelete